Avia Bonne
2 Blog Mensajes
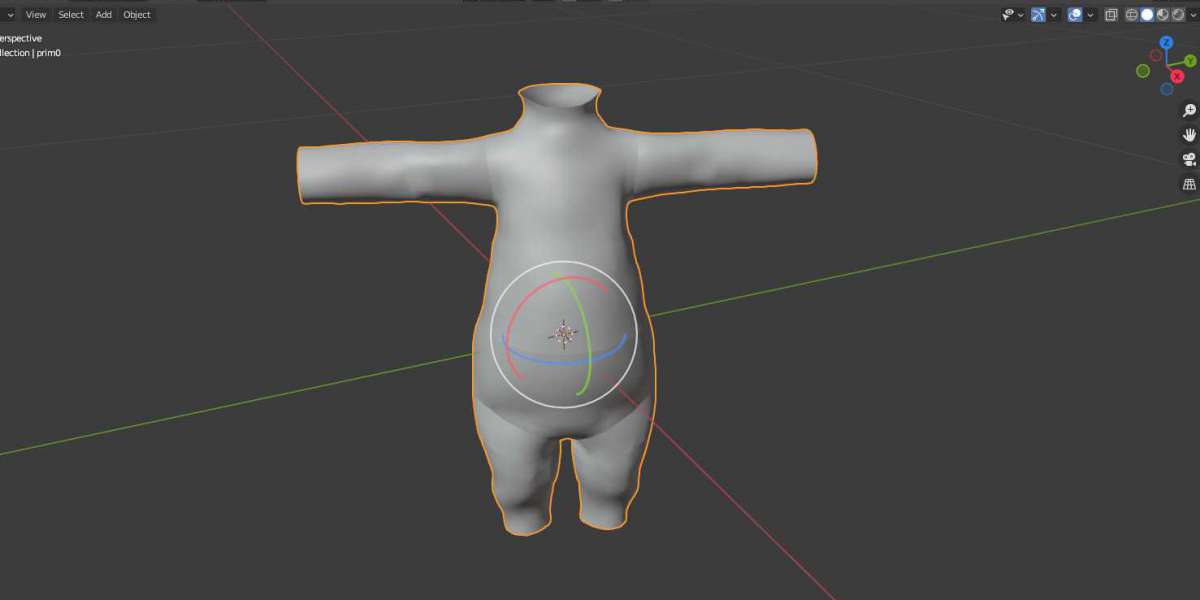
All I wanted was to take a rigged mesh skirt, tweak it a little bit in Blender, and import it into OpenSim. But for some reason, bringing it into Blender destroyed the rigging.Before you start Download the fitted mesh you’d like to edit.Then download the file fitted_mesh_270.blend from the Machimatrix’ Fitted Mesh Kit page — this is the file that will have your new rigging.Also, if you haven’t done this yet, download Blender and configure it by following the “Download and configure Blender” instructions in this article. That article also has instructions for how to use the camera controls and how to move things around.At the very least, do this step:Open Blender. Click on the “File” menu on the top left, select “User Preferences” and click on the “Left” button under “Select With.”Then, go to =inheritFile>Open and select the =inheritfitted_mesh_270.blend file you downloaded in the previous section.The “fitted_mesh_270.blend” file contains a female model, a male model, and a set of rigging.Import old mesh and get rid of old rigging since the file we just opened takes up the first, second and tenth scene slots, the first thing we have to do is choose an empty scene slot to import our mesh model into. You do this by clicking on one of the little squares at the bottom of the screen.Choose a new scene by clicking on one of the little squares. We have a total of 20 scene slots to pick from — I chose the fifth one. If you’ve used GIMP or Photoshop, you’re probably familiar with the idea of layers — transparent sheets that hold different parts of your image. For example, one layer could hold the background graphics, and another layer could hold the foreground image. In Blender, you have scenes. So one scene can hold the exterior of the building, while another scene can hold the interior. You can click on different scenes to see different parts of your build, or Shift-click to see multiple scenes at once.Now, to load the mesh, look up at the top left of the screen, and choose =inheritFile>Import>Collada (default) (.dae). Look for the mesh object that you want to import, then double-click on the file name.All you’ll see on the screen will be an orange dot.Don’t panic!For some reason, the objects simply load in too tiny to be seen with the naked eye.Zoom in on it by clicking =inheritShift-C. They’re also rotated to the side, so you’ll also need to orient them. Type =inheritrz90 and hit “Enter.”=inherit That stands for “rotate around the Z-axis by 90 degrees.”Zoomed and rotated mesh miniskirt with old rigging.You will see your mesh object — in my case, a mini skirt, as in the picture above, with a bunch of arrow heads. The arrow heads are the old rigging.We will disconnect the skirt from the old rigging. Look down to the bottom left of the screen and click =inheritObject>Parent>Clear and Keep Transformation. The “Keep Transformation” part is so that the rotation doesn’t get undone.Disconnecting the old rigging from the skirt.Now you can click on any of the arrowheads. They should be outlined in orange, while the skirt is not. Hit the “Delete” key to make the old rigging go away. That should leave just the skirt on the screen.Here’s just the miniskirt, without its rigging.If you forget to clear the old rigging, then when you delete it, you will delete the skirt, too. Ooops! Hit Ctrl-Z to undo.Fit the clothing to the virtual bodyI want to fit this skirt to the female body model, which is in the first scene slot. I want to be able to see both my skirt and the model, so I hold down the Shift key while I click on the first scene slot.At first, you’ll think that it didn’t do anything. But if you zoom out — by scrolling your mouse button — you’ll see that the skirt is just much, much too small for the model.The mouse scroll wheel zooms your camera in and out.You’ll need to make the skirt bigger. Click on the skirt to select it, then hit the “S” key and drag the mouse to resize. Hit “Enter” or click again to stop the resizing.Once the skirt is big enough, you can use the arrows to move it around. To move the camera up and down, hold down the Shift key while scrolling, and Ctrl-scroll to move the camera right and left.It might take a little fiddling to get the skirt where you want it.The skirt is now scaled to the right size, and adjusted to fit on the model.You might want to check to see how it looks from the side. There’s a “View” menu on the Blender screen. No, not at the top right. That’s a different “View” menu. Not the one in the middle of the second-to-the-right panel. Not the one at the very bottom, on the left. No, you want the “View” menu on the left, about an inch up from the very bottom of the screen.I’d laugh at how awful the Blender interface is, but I’m too busy crying. Give me a second to go get a tissue.Okay, selecting =inheritView>Front will bring up the side view. What? Were you expecting it to start making sense?Adjust the skirt’s position, then=inherit View>Right will bring you back to the front.This is where I made my skirt longer, by typing “s” then “z” then moving my mouse to stretch the skirt out vertically.I made the skirt a little longer, then moved it down a little bit.This is a good time to stop and save your work. =inheritFile>Save As saves everything you’ve got as a new “blend” file.Attach the new rigging Now that I’ve got my skirt the way I want it, it’s time to attach the new rigging.Click on fifth scene slot, so you only have the skirt visible, then Shift-click on the tenth slot to also see the rigging.The new rigging, displayed on top of the skirt.The new rigging looks different from the old one. Instead of the arrowheads, it’s now just black rods. Shift-click on the rigging to add it to the selection. You should have both the skirt highlighted in orange, the rigging in blue and orange, and you’ll have been switched to “Pose Mode.”The mode selection button.Click =inheritCtrl-P and select “Armature Deform” to attach the new rigging.Switch back to “Object Mode” by clicking on the mode selection button near the bottom left of the screen.If you’re not sure whether the rigging is attached or not, click on the rigging and switch to “Pose Mode,” then click-drag one of the blue leg parts around with your mouse and see if the skirt moves with it.Export from Blender to OpenSimIn “Object Mode,” select just the skirt, then click on =inheritFile>Export>Collada (default) (.dae).Under “Operator Presets” in the middle of the left-hand panel, select “SL + OpenSim Rigged.” Type in a new file name, then click on the “Export COLLADA” button at top right. In the Firestorm viewer, go to =inheritBuild>Upload>Mesh Model… and find where you saved the mesh file.Under “Model name,” type in a new name for your object. Under “This model represents…” choose “Avatar attachment” and under “Upload options” select “Include skin weight” and “Include joint positions.” Click “Calculate weights & fee,” wait a couple of seconds, then click “Upload.”The new mesh will show up in your inventory, and you can put it on.Import existing mesh into scene slot five=inheritShift-C to zoom in, =inheritrz90 and =inheritenter to rotate=inheritObject>Parent>Clear and Keep Transformation to disconnect old rigging. Then click on rigging and hit delete to delete it.=inheritShift-click on first and fifth scene slots to show both the female model and skirt.Click on “s” and move mouse to stretch, scroll to zoom camera, =inheritShift-scroll and =inheritCtrl-scroll to move camera.=inheritShift-click on fifth and tenth scene slots to show both the skirt and the new rigging.=inheritCtrl-P and select “Armature Deform” to attach the new rigging.In “Object Mode,” select just the skirt, then click on =inheritFile>Export>Collada (default) (.dae).Under “Operator Presets,” select “SL + OpenSim Rigged.” Type in a new file name, click “Export COLLADA.”In Firestorm, go to =inheritBuild>Upload>Mesh Model…Fill in new “Model name.” Under “This model represents…” choose “Avatar attachment” and under “Upload options” select “Include skin weight” and “Include joint positions.” Click “Calculate weights & fee,” wait a couple of seconds, then click “Upload.”
2 Blog Mensajes